Open the web page to the Outlook Web App and sign in with your email address and the associated password.
Step 2:
Change to the calendar view (bottom left of the bar calendar)
Step 3:
- In the left splitter, see the point My calendar is a listing of their calendar.
- Right click on your calendar to see (under "My Calendars"), selection as in the image.
- Click Share in the context menu on this calendar.
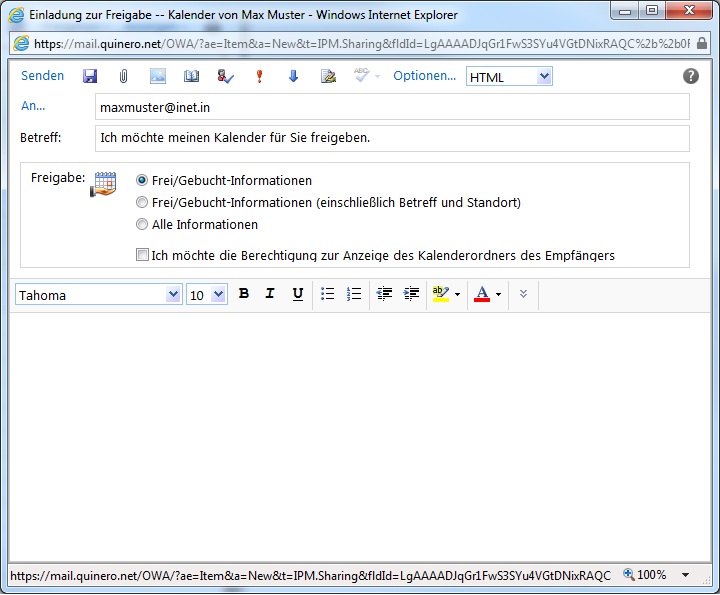
- It opens a new window that is similar to the window to create a new e-mail.
Step 4:
Enlist in the receiver line, the email addresses of all contacts one for which you want to share your calendar. Alternatively, you can click next to the line receiver to On, which opens a new window where you can select a desired contact by clicking from the list to him by clicking on the button at left - add> the recipient list. You can then select another contact and put together in this way an arbitrarily long list of recipients.
If you have added to the list all the contacts, click the lower right OK. The window will then close and the contacts are added to the recipient line of the invitation.

You can activate three different sharing options:
- Free / busy information:
the other person is only displayed if certain dates are available or already busy. For more information such as Subject or location of the appointment will not be displayed. - Free / busy information (including subject and location):
the other person will be displayed in addition to the information of the first option subject and location of an appointment. - All informationen:
the other people are all registered information displayed on one date (eg additional notes).
Note that you can grant read-only access via OWA on your calendar! To enable write access, you must make the release in Microsoft Outlook!
In the text box below, you can enter a personal message for the recipient. However, this is not absolutely necessary, because the message is automatically added to a standard text.
When you have made all desired settings, click the top left of Send. The release is then issued to all registered users.


