Normally, your Hosted Exchange mailbox simply set up automatically via the Autodiscover function by specifying e-mail address and password in Outlook. Where the device does not work via AutoDiscover, eg since the CNAME entry for autodiscover.yourdomain.com could not be set, you can configure Outlook manually, but is non us not be supported "unsupported", ie use at your own risk.
- Subscribe to the Outlook Web App with your user data.

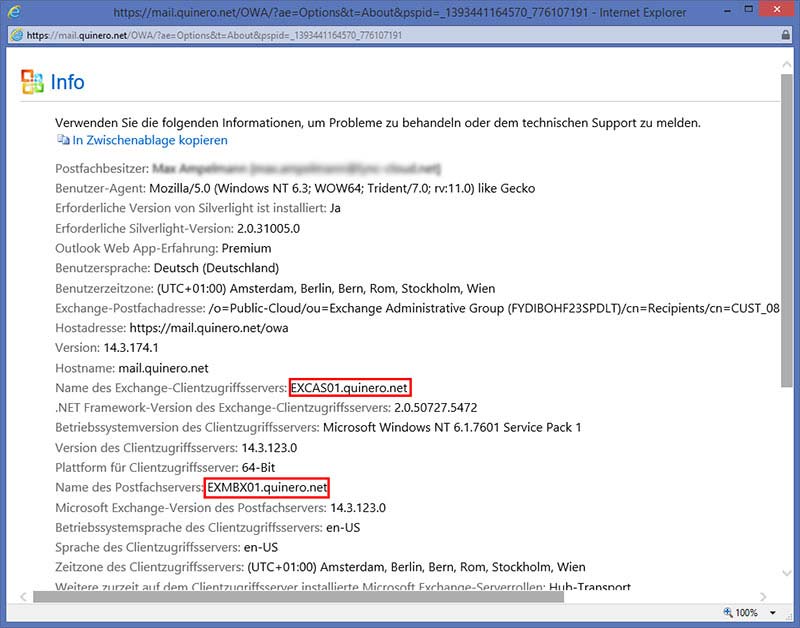
- Click on the Outlook Web App on the top right "question mark" and "Info".

- This opens a pop-up window with all sorts of information - now you have to search the Exchange Client Access server address and a note.

- In functioning Outlook that looks like this:

- Important: It must be configured not necessarily the proxy settings.

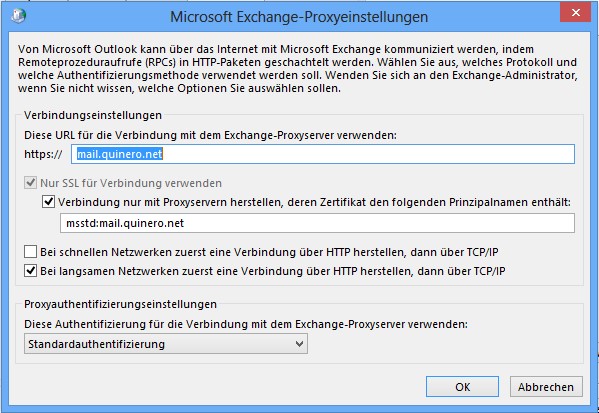
- Now the proxy address:

Manual configuration of your Exchange account in Outlook 2010:
- Quit Outlook and open the Control Panel.
- Double click on the email icon in the Control Panel
- Click "Show Profiles", and then click Add.
- Give the profile a name
- Select "Configure server settings or additional server types" then click Next.
- Select Microsoft Exchange or compatible service and click on continue.
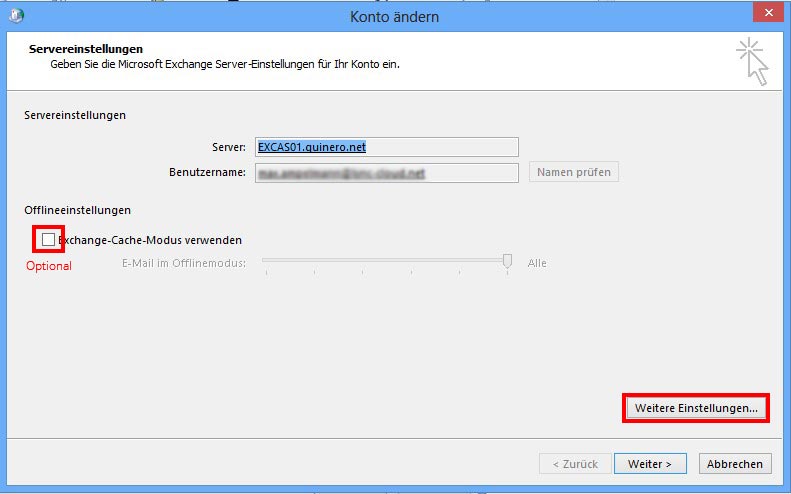
- the mailbox server name as above determined in the Server field: Enter the
- Into the field Username: Enter your primary email address eg name@yourdomain.com - the primary email address is in the info screen up there also again in the first line, if you are not sure what is the primary email address.
- Click "More Settings", then Connections
- Make sure that the Connect to Microsoft Exchange using HTTP is checked and then click Exchange Proxy Settings.
- Under this URL to connect to the Exchange proxy server https:// enter the host name of the proxy server that we have identified above
- Make sure that "only connect to proxy servers whose certificate contains the following principal name:" is checked and then type in the box directly below the following: msstd: mail.quinero.net
- Hook the two boxes "On fast networks, connect using HTTP first first, then connect using TCP / IP" and "In slow networks, connect using HTTP first then connect using TCP / IP"
- Select the "Basic Authentication" In the Proxy authentication settings.
- Continue with 2 times OK
- Click Check Names. If the server name and the user name are displayed with an underline, click Next.
- Click Finish.
Important Note: We advise thereof from urgent to use manually configured Outlook accounts with Hosted Exchange because the server configuration in the cloud could well change again. A manually konfigurierters Outlook account without AutoDiscover can thus leave the service.


